Here we’ll see how this can be done step-by-step with configurations of convolution that we’re likely to see working with images.
In particular, transposed convolutions are thought of as difficult to grasp. Here we’ll show that they’re not difficult at all by working though some examples which all follow a very simple recipe.
Example 1: Convolution With Stride 1, No Padding
In this first simple example we apply a 2 by 2 kernel to an input of size 6 by 6, with stride 1.

The picture shows how the kernel moves along the image in steps of size 1. The areas covered by the kernel do overlap but this is not a problem. Across the top of the image, the kernel can take 5 positions, which is why the output is 5 wide. Down the image, the kernel can also take 5 positions, which is why the output is a 5 by 5 square. Easy!
The PyTorch function for this convolution is:
nn.Conv2d(in_channels, out_channels, kernel_size=2, stride=1)
Example 2: Convolution With Stride 2, No Padding
This second example is the same as the previous one, but we now have a stride of 2.

We can see the kernel moves along the image in steps of size 2. This time the areas covered by the kernel don’t overlap. In fact, because the kernel size is the same as the stride, the image is covered without overlaps or gaps. The kernel can take 3 positions across and down the image, so the output is 3 by 3.
The PyTorch function for this convolution is:
nn.Conv2d(in_channels, out_channels, kernel_size=2, stride=2)
Example 3: Convolution With Stride 2, With Padding
This third example is the same as the previous one, but this time we use a padding of 1.

By setting padding to 1, we extend all the image edges by 1 pixel, with values set to 0. That means the image width has grown by 2. We apply the kernel to this extended image. The picture shows the kernel can take 4 positions across the image. This is why the output is 4 by 4.
The PyTorch function for this convolution is:
nn.Conv2d(in_channels, out_channels, kernel_size=2, stride=2, padding=2)
Example 4: Convolution With Coverage Gaps
This example illustrates the case where the chosen kernel size and stride mean it doesn’t reach the end of the image.
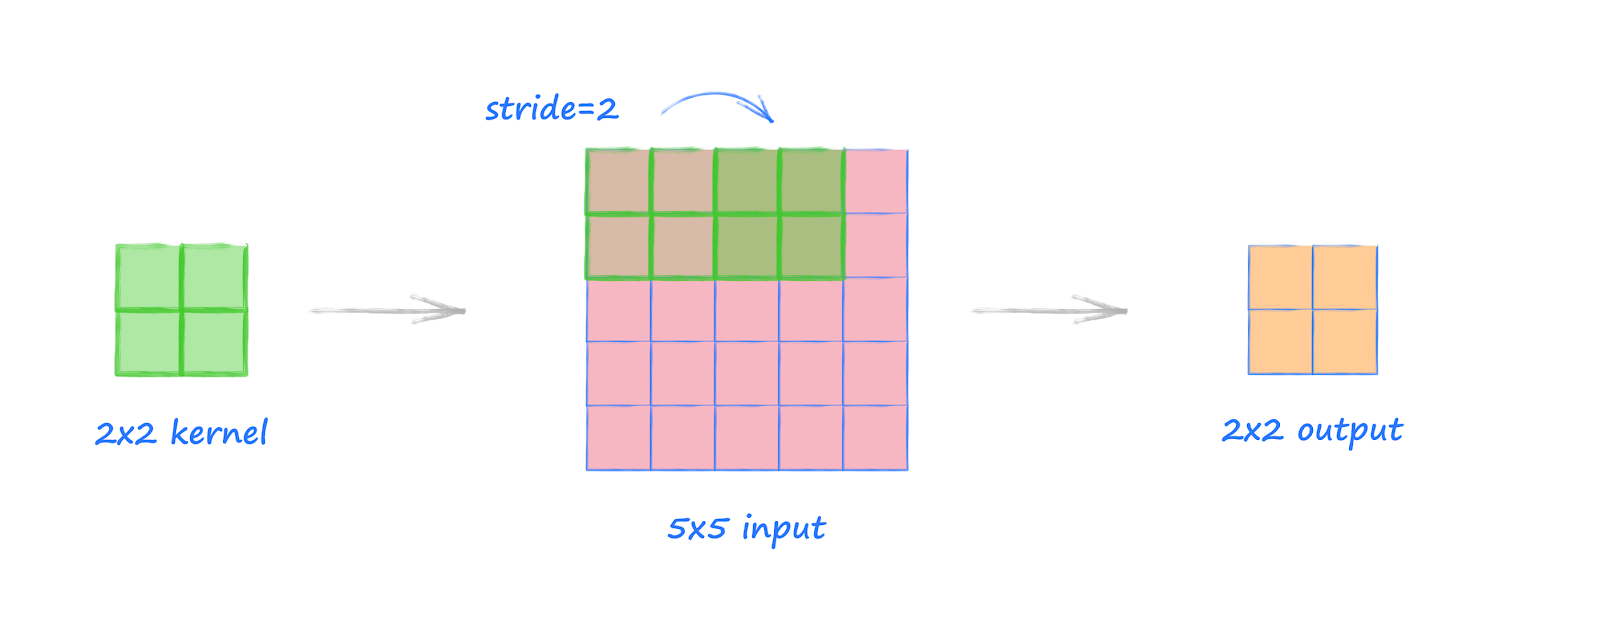
Here, the 2 by 2 kernel moves with a step size of 2 over the 5 by 5 image. The last column of the image is not covered by the kernel.
The easiest thing to do is to just ignore the uncovered column, and this is in fact the approach taken by many implementations, including PyTorch. That’s why the output is 2 by 2.
For medium to large images, the loss of information from the very edge of the image is rarely a problem as the meaningful content is usually in the middle of the image. Even if it wasn’t, the fraction of information lost is very small.
If we really wanted to avoid any information being lost, we’d adjust some of the option. We could add a padding to ensure no part of the input image was missed, or we could adjust the kernel and stride sizes so they matches the image size.
Example 5: Transpose Convolution With Stride 2, No Padding
The transpose convolution is commonly used to expand a tensor to a larger tensor. This is the opposite of a normal convolution which is used to reduce a tensor to a smaller tensor.
In this example we use a 2 by 2 kernel again, set to stride 2, applied to a 3 by 3 input.
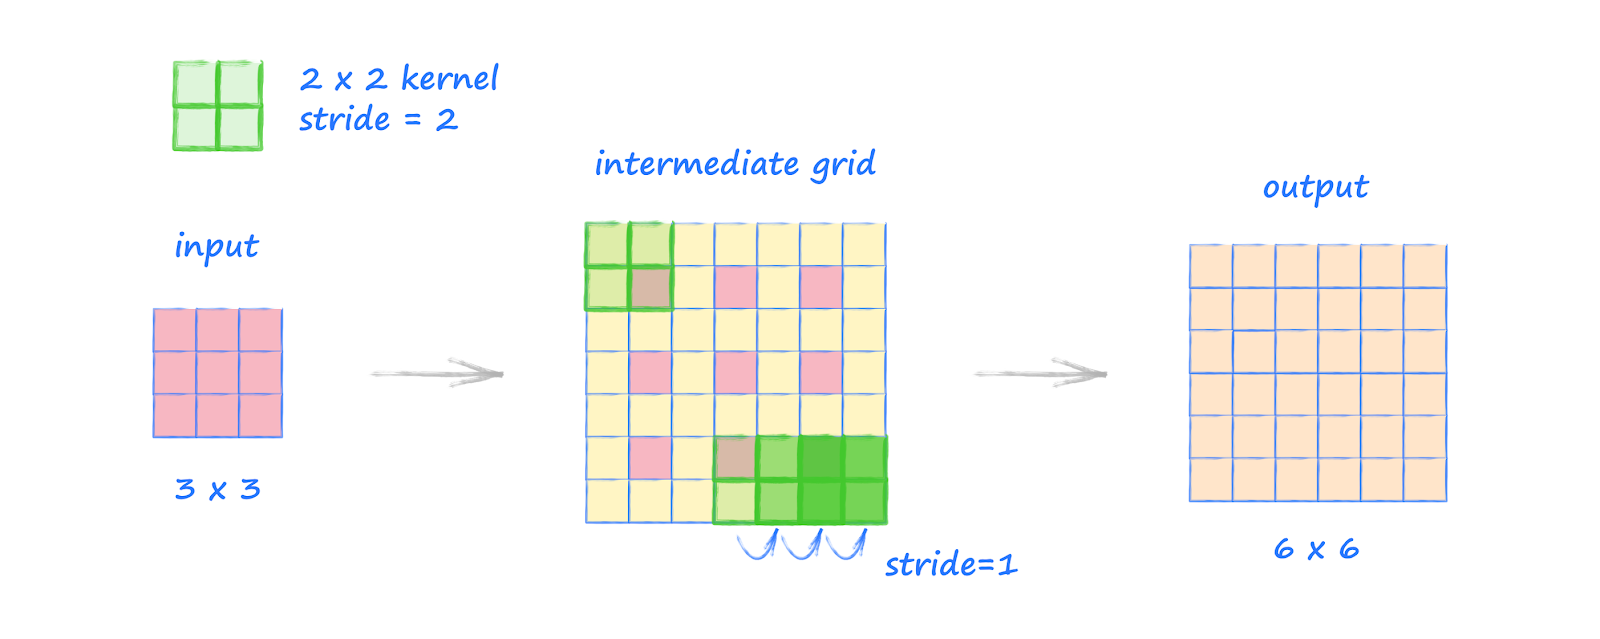
The process for transposed convolution has a few extra steps but is not complicated.
First we create an intermediate grid which has the original input’s cells spaced apart with a step size set to the stride. In the picture above, we can see the pink cells spaced apart with a step size of 2. The new in-between cells have value 0.
Next we extend the edges of the intermediate image with additional cells with value 0. We add the maximum amount of these so that a kernel in the top left covers one of the original cells. This is shown in the picture at the top left of the intermediate grid. If we added another ring of cells, the kernel would no longer cover the original pink cell.
Finally, the kernel is moved across this intermediate grid in step sizes of 1. This step size is always 1. The stride option is used to set how far apart the original cells are in the intermediate grid. Unlike normal convolution, here the stride is not used to decide how the kernel moves.
The kernel moving across this 7 by 7 intermediate grid gives us an output of 6 by 6.
Notice how this transformation of a 3 by 3 input to a 6 by 6 output is the opposite of Example 2 which transformed an input of size 6 by 6 to an output of size 3 by 3, using the same kernel size and stride options.
The PyTorch function for this transpose convolution is:
nn.ConvTranspose2d(in_channels, out_channels, kernel_size=2, stride=2)
Example 6: Transpose Convolution With Stride 1, No Padding
In the previous example we used a stride of 2 because it is easier to see how it is used in the process. In this example we use a stride of 1.

The process is exactly the same. Because the stride is 1, the original cells are spaced apart without a gap in the intermediate grid. We then grow the intermediate grid with the maximum number of additional outer rings so that a kernel in the top left can still cover one of the original cells. We then move the kernel with step size 1 over this intermediate 7 by 7 grid to give an output of size 6 by 6.
You’ll notice this is the opposite transformation to Example 1.
The PyTorch function for this transpose convolution is:
nn.ConvTranspose2d(in_channels, out_channels, kernel_size=2, stride=1)
Example 7: Transpose Convolution With Stride 2, With Padding
In this transpose convolution example we introduce padding. Unlike the normal convolution where padding is used to expand the image, here it is used to reduce it.
We have a 2 by 2 kernel with stride set to 2, and an input of size 3 by 3, and we have set padding to 1.

We create the intermediate grid just as we did in Example 5. The original cells are spaced 2 apart, and the grid is expanded so that the kernel can cover one of the original values.
The padding is set to 1, so we remove 1 ring from around the grid. This leaves the grid at size 5 by 5. Applying the kernel to this grid gives us an output of size 4 by 4.
The PyTorch function for this transpose convolution is:
nn.ConvTranspose2d(in_channels, out_channels, kernel_size=2, stride=2, padding=1)
Calculating Output Sizes
Assuming we’re working with square shaped input, with equal width and height, the formula for calculating the output size for a convolution is:

The L-shaped brackets take the mathematical floor of the value inside them. That means the largest integer below or equal to the given value. For example, the floor of 2.3 is 2.
If we use this formula for Example 3, we have input size = 6, padding = 1, kernel size = 2. The calculation inside the floor brackets is (6 + 2 - 1 -1) /2 + 1, which is 4. The floor of 4 remains 4, which is the size of the output.
Again, assuming square shaped tensors, the formula for transposed convolution is:
Let’s try this with Example 7, where the input size = 3, stride = 2, padding = 1, kernel size = 2. The calculation is then simply 2*2 - 2 + 1 + 1 = 4, so the output is of size 4.
On the PyTorch references pages you can read about more general formulae, which can work with rectangular tensors and also additional configuration options we’ve not needed here.
- nn.ConvTranspose2d https://pytorch.org/docs/stable/nn.html#convtranspose2d
More Reading
- Convolutional neural networks: https://en.wikipedia.org/wiki/Convolutional_neural_network
- Convolutions in image classification and generation: http://makeyourownalgorithmicart.blogspot.com/2019/06/generative-adversarial-networks-part-iv.html